
How to export your book from WriteWithPaige (Word, EPUB, PDF, Kindle, AO3)
Open the Export hub from the chapter list, pick where the book is going, choose what to include, then download, copy or send it. You can make a Word file, an EPUB, a print-ready PDF, a Kindle copy, an agent manuscript, AO3 import links or copy-ready text for Wattpad and other sites. Exporting is free on every plan.
9 min readUpdated

On this page
- Step by step
- Every destination and what you get
- What to include: chapters, a folder or the whole book
- Cover, title page, copyright and dedication
- The "Written with WriteWithPaige" line
- Copy for Wattpad, Royal Road and other sites
- Post to AO3 without sharing your password
- Kindle, KDP, print and agent submissions
- Other ways to get your words out
- Questions
Step by step
Step 1: Open the Export hub
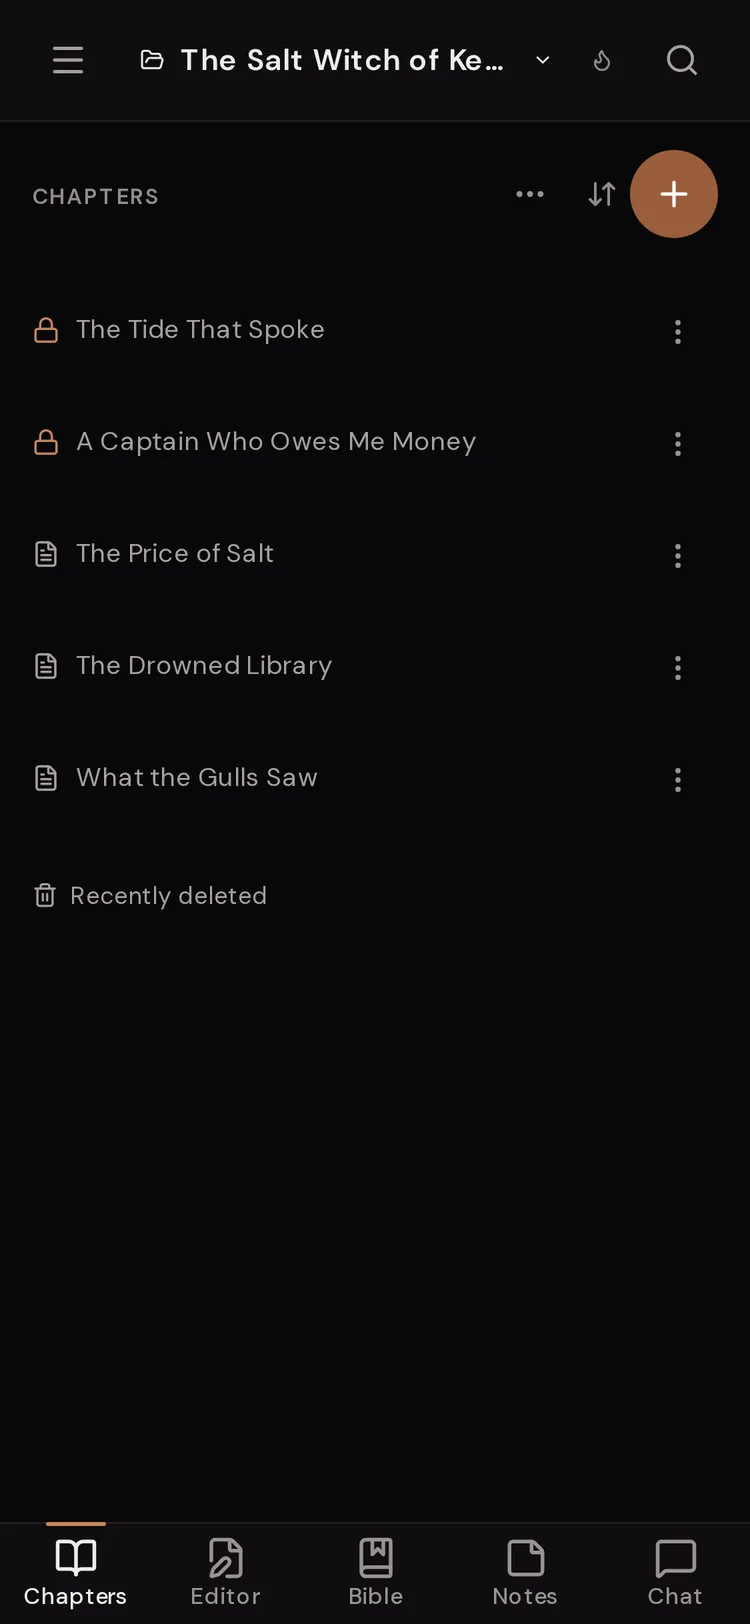
In the chapter list, tap the export button at the top (its label is “Export or share this book”), or open the ⋯ “More chapter actions” menu and choose “Export or share…”. On a phone, open the “Chapters” tab first. To export one chapter, use that chapter’s ⋯ menu and choose “Export…”, or use “Export this chapter” in the editor’s ⋯ menu.
Step 2: Pick where it is going
The first screen asks “Where is this going?”. Tap a destination, for example “Word file”, “EPUB” or “Send to Kindle”. If you picked “Copy for a site”, choose the site under “WHICH SITE?”. If you exported before, a “Same as last time” button at the top repeats your last choice.
Step 3: Choose what to include
On “What to include”, pick the scope under “WHAT”: the chapter or folder you started from, or “Whole project”. Then set the options for that destination: the cover, the title page and pen name, “Copyright page and dedication”, and “Part pages from folders”. Tap “Continue”.
Step 4: Preview and go
The last screen, “Preview and go”, shows a short preview where it can. Tap the download button (for example “Download Word file”), “Build PDF”, “Download for Kindle” or the copy buttons. When it finishes, the button changes to “Downloaded. Export again”.
Step 5: Set your pen name once
Open Settings and find “Exports”. Type the name you want under “Name on your exports”. It is printed under the title of every Word, EPUB and Story Bible export. Switch on “Leave my name off exports entirely” if you want no name at all.


Every destination and what you get
The Export hub starts with the place your book is going, not the file type. Each destination sets the right format for you. In a Brand workspace you only see the general ones: “Copy for a site”, “Word file”, “EPUB”, “Markdown” and “Plain text”.
- “Publish free on ReadFanFiction”
- Sends your story to ReadFanFiction as a draft. Nothing goes public until you post it there. See the ReadFanFiction guide.
- “AO3 (Archive of Our Own)”
- Makes import links AO3 can read, with your tags filled in, or helps you post your next chapter. It never asks for your AO3 password.
- “Copy for a site”
- Copies one chapter at a time, formatted for Wattpad, Royal Road, Substack, Google Docs, Patreon, the AO3 editor or Discord.
- “Send to Kindle”
- Downloads a Kindle file, or emails the book straight to your Kindle.
- “Amazon KDP (e-book)”
- A file ready to upload to Kindle Direct Publishing. Pick “EPUB (recommended)” or “Word”.
- “Print book (PDF)”
- A print-ready PDF at a trim size KDP print and most printers accept: 5 × 8 in, 5.5 × 8.5 in or 6 × 9 in.
- “Agent submission”
- Standard manuscript format for literary agents, with your contact block, a font choice and a rounded word count.
- “Word file”
- A .docx for Word, Google Docs or Scrivener.
- “EPUB”
- An e-book file for e-readers and KDP.
- “Markdown”
- For backups or notes apps. One file, or a ZIP with one file per chapter.
- “Plain text”
- One file with every chapter, ready to paste anywhere.
What to include: chapters, a folder or the whole book
Where you open the hub decides the first choice. From a chapter’s ⋯ menu you start with “This chapter”. From a folder’s ⋯ menu you start with that folder. If you selected several chapters (with “Select several”), you start with “Selected”. “Whole project” is always there too.
Exports always follow book order, not the sort you picked in the sidebar. The hub tells you this when your list is sorted.
- Chapters with no text are skipped. The hub tells you how many, and names them after the download.
- Drafts from Paige that you have not accepted yet are left out. The hub says how many are waiting. Accept them first if you want them in the book.
- If your newest edits have not saved yet, the hub saves them first. If that fails, you can tap “Try again” or “Export last saved version”.
Cover, title page, copyright and dedication
Word, EPUB, KDP and print exports have a “TITLE PAGE” section. It shows your book title and the name that will be printed under it. To use another name just this once, tap “Use a different name for this export”, type it and tap “Use once”. “Undo” puts your normal name back.
Open “Copyright page and dedication” for three extras. “Copyright page” adds a line with the year and your name, followed by “All rights reserved.”. It needs an author name, so it is unavailable when your name is hidden. “Dedication” adds its own page with whatever you type.
EPUB, print, Kindle and KDP EPUB exports have a “COVER” section. If your project has a book cover, “Put my cover first” puts it on the first page (and e-readers use it as the thumbnail). No cover yet? Tap “Add a cover” to upload one. For a print PDF going to KDP paperback, turn the cover off, because KDP takes the cover as its own file.
The "Written with WriteWithPaige" line
Word, EPUB, Markdown, plain text and print PDF exports end with one quiet line after your last chapter: “Written with WriteWithPaige”. Agent submissions and Kindle copies never get it.
On any paid plan you can switch it off for an export. Open “Copyright page and dedication” and turn off “End with “Written with WriteWithPaige””. On the Free plan the line is always included.
Copy for Wattpad, Royal Road and other sites
Sites post one chapter at a time, so “Copy for a site” gives you one copy button per chapter. Tap it, then paste into the site’s editor. Formatting such as italics, bold and scene breaks comes with it.
- Wattpad
- Keeps italics and bold. Copy the title separately with “Copy title”.
- Royal Road
- Keeps formatting and scene breaks.
- Substack
- Keeps headings and formatting.
- Google Docs
- Keeps colour and alignment.
- Patreon
- Keeps formatting and scene breaks.
- AO3 editor
- Paste into AO3’s Rich Text editor.
- Discord
- Markdown, split into parts that fit one message. Switch on “I have Nitro (4,000 characters per message)” for longer parts.
Post to AO3 without sharing your password
Choose “AO3 (Archive of Our Own)”. The first time, type “Your AO3 username” (never your password). Then fill in the work: “Title on AO3”, “Rating”, “Warnings”, “Category”, fandoms, relationships, characters, “Additional tags” and the “Summary”. You can switch on “Add an “AI-assisted” tag” so readers know Paige helped. It is off unless you turn it on.
Next you add optional chapter notes, then a check step. “Before you can post this” lists anything missing. “Worth a look” explains that long chapters are split to fit AO3’s size limit and that images and text colour are left out.
On the last step, choose how long the link lasts under “Link expires after” (1 hour, 24 hours or 7 days) and tap “Create import link”. Copy the links, tap “Open AO3 import” and fill in AO3’s form in the order shown. Choose “Chapters in a single work” and leave “Post without previewing” off so you can check it first.
Already posted the work? Paste its AO3 address under “Already posted on AO3?”. The hub then shows the next unposted chapter with “Copy chapter for AO3”, “Copy title”, “Open AO3 new chapter” and “Mark as posted”.
Kindle, KDP, print and agent submissions
“Send to Kindle” has two ways. “Download for Kindle” saves a file you upload on Amazon’s Send to Kindle page (“Open Amazon Send to Kindle”). Or tap “Email it to my Kindle instead”, enter your “Kindle email address” (it must end in @kindle.com or @free.kindle.com) and tap “Send”. First add kindle@writewithpaige.com to Amazon’s approved senders. The “Copy address” and “Amazon’s Personal Document Settings” buttons help with that. There is a daily cap on Kindle emails. If you hit it, download instead.
“Print book (PDF)” builds a PDF at your chosen trim size. Tap “Build PDF”. Long books can take up to two minutes. A very big book builds in the background and you get an email with a link when it is ready.
“Agent submission” asks for your contact block (shown on the first page): “Legal name”, “Address line 1”, “Address line 2”, “Email” and “Phone”. Pick “Courier Prime” or “Times New Roman” under “FONT”, and check the “Word count”, which is shown rounded on the first page.
Other ways to get your words out
The Export hub is for chapters. These other buttons cover the rest of your project.
- “Export this chapter”
- Editor status bar ⋯ menu. Opens the Export hub with the open chapter.
- “Copy as Markdown”
- Same ⋯ menu. Copies the open chapter as Markdown text.
- “Export Story Bible as Word (.docx)”
- Top of the Story Bible. Downloads every entry as a Word file. A Bible folder’s ⋯ menu has “Export as Word (.docx)” for just that folder.
- “Export all notes as Markdown”
- Top of the Notes list. Downloads your notes as Markdown.
- “Export” (project ⋯ menu)
- Projects panel. Downloads a ZIP of the project: chapters, Story Bible and notes as Markdown files.
- “Export Data”
- Settings, near the bottom. A full backup of your account. See the “Your data” guide.
Questions
Is exporting free?
Yes. Every destination works on the Free plan. The only difference is that paid plans can switch off the “Written with WriteWithPaige” line at the end of a book.
Why are some of my chapters missing from the export?
Empty chapters are skipped, and Paige drafts you have not accepted yet are left out. The hub tells you both before you download. Also check the scope: “This chapter” or a folder only exports that part. Pick “Whole project” for everything.
Why is my export in a different order from my sidebar?
Exports always use book order (your manual order), not the sort you picked to view the list. Set the sort back to “Manual order” and drag chapters to change book order.
How do I put a pen name on my book?
Open Settings, find “Exports” and type your pen name under “Name on your exports”. It is used on every Word, EPUB and Story Bible export. For a single export, use “Use a different name for this export” on the title page step.
Do I give WriteWithPaige my AO3 password?
No. You only type your AO3 username. WriteWithPaige makes import links that AO3 reads, and you finish the import while signed in to AO3 yourself.
My Kindle email did not arrive. What now?
Check that kindle@writewithpaige.com is on your approved senders list in Amazon’s Personal Document Settings. It usually arrives within a few minutes. If not, use “Download instead” and upload the file on Amazon’s Send to Kindle page.
Can I export on my phone?
Yes. Open the “Chapters” tab and use the export button at the top, or a chapter’s ⋯ menu. Files go to your phone’s downloads. Copy buttons put the text on your clipboard.
Related guides
Try it on your own story.
Start writing free